
Find your email from help@merits.com with the Email subject: Favorite Staffing has sent you an official digital credential
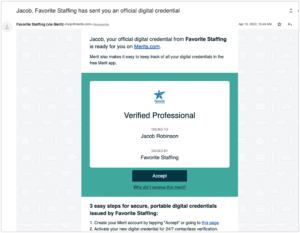
- Click the Accept button
- Create a password for your Merit account
- Accept the terms and conditions
After creating your Merit account, download the Merit app to your phone, available on Google Play and Apple’s App Store, and log in.
You are now ready to check in for your shifts.
Some Favorite Staffing locations will have a Merit tablet available for you to use to scan in and out each day.
Step-by-step instructions:
On your smartphone:
- Login to your Merit profile
- Open your personal QR code
On the Merit tablet:
- Select Check-in at the start of your shift, and Check-out at the end of your shift.
Scan your QR code
*The first time you scan in, you’ll be asked to accept a Merit Check-in access merit. Please accept that merit on your phone to finish your check-in**
When activated:
Some Favorite Staffing sites will be using a “virtual kiosk”, a link that you can use to check yourself in using your own device
When you follow the link, you will be brought to a page that gives you these options:
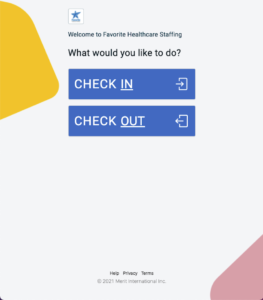
Select Check-in
Enter your email and password for Merit, then select Login.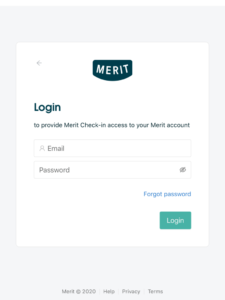
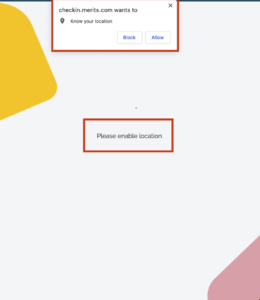
Allow Merit to know your location when you check-in or check out.
Important: Enabling location is required by IEMA and Favorite Staffing. Your location will ONLY be recorded during check-in and check-out and never at any other time.
You will then see a success message indicating that you are now checked into the activity.
Check Out
Use the same URL used to Check-in, this time select Check Out.
Enter your email and password if prompted and select Login.
You will see a screen that shows your check in date and time along with your check out date and time and the total duration.
A time receipt merit will be sent to you with your record of hours worked.
How to Turn on Location Services on iPhone
You probably enabled Location Services when you set up your iPhone. If not, turning them on is super easy. Just follow these steps:
- Tap Settings.
- Tap Privacy.
- Tap Location Services.
- Move the Location Services slider to on/green. Location Services are now on. Apps that need them can start accessing your location right away.
- Scroll down to see your Location Services preferences for individual apps. Ensure that whichever web browser application you use to open the shared check-in links (e.g. Safari, Chrome) has Allow Location Access set to “While Using the App”. Enable Precise Location as well.
How to Turn on Location Services on Android
Location Services are enabled during the setup of your Android device, but you can also enable them later by doing this:
- Tap Settings.
- Tap Location.
- Move the slider to On.
- Tap Mode.
- Select the Mode you prefer:
High accuracy: Delivers the most accurate location information by using GPS, Wi-Fi networks, Bluetooth, and cellular networks to determine your location. It’s got the highest accuracy, but it uses more battery and has less privacy.
These instructions use Android 7.1.1, but they should be similar to other, recent versions of Android.